Saturday, November 16, 2013

Giving Back

 
     As we move into the holiday season, I always start reflecting on all the important things in my life. My incredible husband and my three beautiful children are definitely my most wonderful blessings. I can't imagine my life without my sweet loves. Even though we're by no means wealthy, we've never gone without our basic needs. I have a roof over my head, food in my pantry, and clothes on my back. And for those things, I am so grateful.
    So when my church began a project in Tanzania to help the Shalom Orphanage, it really touched my heart. These sweet babies are across the ocean without so many of the things that we take for granted everyday. Many of them have incredible stories of survival. Here are some of their faces:

 : Mama Warra - The Founder & Executive Director of Shalom Orphanage Center

As you see here, she so loves the Children and the smile you see is not photographic. She is really devoted and all who visit Shalom applaud her efforts and loving kindness to the Orphans and the most vulnerable Children. 

  : “Goodluck” was found by a Good Samaritan, his whole body was buried, from the neck down. 

His parents don’t even know his birthdate.  When he was brought to the Orphange he was approximately 5 months old.

After many prayers and close attention, Goodluck is doing very fine, as you can see from his picture, by the grace of GOD. He is now 3 years old.

      The little boy on the right is “Goodluck”.  He was found by a Good Samaritan, and his whole body was buried, from the neck down. His parents don’t even know his birth date. When he was brought to Shalom Orphanage he was approximately 5 months old. After many prayers and close attention, Goodluck is doing fine, by the grace of GOD. He is now 3 years old.
     
       To read more stories from the Shalom Orphanage Center, visit:       http://www.goldsboroworshipcenter.com/Their-Stories.html 

   I've been pondering how I can give back to this project for some time. This month I'll be donating a portion of all my TpT sales to The Tanzania Project which will provide a stable income to support these, and many other, precious children. If you'd like to give back please visit my Teacher Pay Teachers store for some budget-friendly resources or visit the link below to donate directly to this incredible project.


Monday, November 11, 2013

Soaring Through the Solar System


       My students soared to the stars during our solar system unit. Many of the science concepts are abstract and therefore tough for third graders to wrap their minds around. To help my kids out, we watched The Magic School bus take an adventure through our solar system on Discover Education (streaming videos). We also explored deep space on our ipads with several apps (FYI: We scored all these apps absolutely FREE through the "Apps Gone Free" app).

 These are some of our favorites:

Britannica Kids: Solar System is the prefect app for exploring the secrets of the Solar System in a fun and engaging way. Learn and play at the same time through a variety of games like Memory Match, Jigsaw Puzzles, and the Magic Square among others. Explore the solar system through a wealth of amazing images (which you can e-mail to friends!) videos and informative articles. And as it’s from Encyclopedia Britannica, you can be sure it’s appropriate and safe for the whole family.


Interactive Minds: The Solar System
This app is one of my absolute favorites for exploring solar system concepts! The kids can visit all different aspects of our solar system (and beyond) with real satellite images and deep space video snippets. The visuals are stunning! Check out the video below for a visual tour of some of the app features.


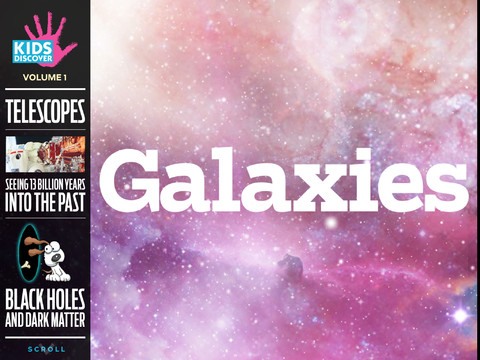
KIDS DISCOVER: Galaxies
Kids Discover is always creating new apps on a variety of topics. Keep a sharp eye out for these little goldmines in the Apple Store! They usually have 1-3 free apps available at any given time. Once they cycle off sale, they'll cost you. I love to use these apps as research tools. We can easily generate written responses or research writing on a variety of solar system related topics.
This is just one of the great apps I have from Kids Discover (there is also a super "Sun" app available).


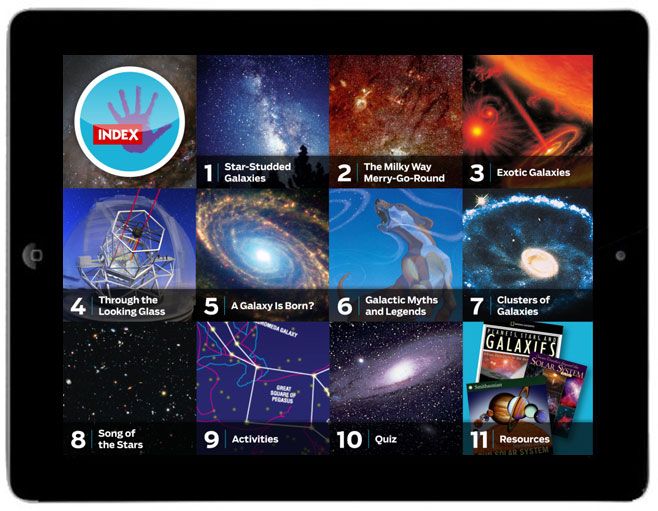
Each Kids Discover app will open with a dashboard like this one. Students can click directly on the subtopic they wish to see, or they can scroll through all the contents one screen at a time.


       NASA has a large number of apps, but my top pick is the Space Place app for kids.


      The "Planets" app is a great tool for teaching constellations and how the patterns in the night sky move. In the past, I've tried to use small planetariums (you can find these at Walmart, Hobby Lobby, etc.). However, it's next to impossible to darken my classroom enough for the stars to be very visible.  This was a little easier option for me, and the kids think it's cooler since it's on an ipad. ;D I usually project the app onto my Promethean Board via a VGA adapter cable or by mirroring the image with my Apple TV.


If you're interested in using this app, check out this video tutorial created by the app creator:
                                     

There are fantastic new apps coming out ALL the time so feel free to comment below if you have any recommendations!


  We're also orbiting around solar system concepts in the great outdoors (okay, it's our school parking lot). Once we got our inflatable solar system set blown up, we took them outside and explored orbiting. We started in the center of our solar system with the sun. Then we traveled to the edge of our place in space by naming each planet.  As we traveled farther from the sun, my students used sidewalk chalk to draw each planet's orbit around the sun.
 

After we practiced orbiting, we talked about how the planets also rotate on an axis as they travel in their orbit. My students traded places and the new group demonstrated their rotating skills. 
It's not as easy as it looks to rotate while orbiting!


Pumpkin Planets are a fun project idea if you want an extra extension to get your kids interested in solar system research. I saw a huge number of pumpkins that had been decorated as book characters for Book Character Day. It inspired me to use these seasonal squash to tie in some science concepts. Students can research a planet of their choice and then use a pumpkin to create a 3D model of the planet. 
Next year, I'll recommend using varying sized pumpkins for larger/smaller planets so the models have a little better scale to size.


       If you're interested in more engaging solar system activities for your classroom, 
check out my science products at TpT.
 Thanks for stopping by!


Solar System Flipbook


 Discover Adventure Travel Brochures


Friday, November 8, 2013

Tech Tools: TED, Tellagami, Gooru, Bitly, & PhotoFunia


Create Lessons Worth Sharing around YouTube videos


What is Tellagami?
Tellagami is a mobile app that lets you create and share a quick animated message called a Gami.


Ready to give it a try? Check out this short tutorial to get you started on this new tool!
Classroom Applications: Let students create gamis to share what they've learned and/or present information to their peers.
*I'm planning to try this out when we study historical events and to bring student biographies to life online!


Imagine a teaching tool that streamlines your class preparation process. With Gooru, a free search engine for learning, you can quickly find topic-relevant, standards-aligned resources and organize them into teachable and sharable “collections” — all in one place. 


bit.ly allows users to shorten, share, and track links (URLs). 
Reducing the URL length makes sharing easier 
(especially for younger students who have trouble typing in long address links)

Read more: http://www.crunchbase.com/company/bitly#ixzz2k6axI8UK
Follow us: @crunchbase on Twitter | crunchbase on Facebook


Get Started!
Classroom Tip: Use Bitly for student research links
 (I like to post mine on my class Edmodo page and my school website page for parents and students to access as needed)


PhotoFunia is the best way to add a spark to your photos, make them special and more original. In only a few seconds an amazing photo collage is ready, absolutely free. PhotoFunia is so straight forward to use, that anyone, at any age, can use it with ease.


How did you use these techie tools? 

Leave a comment below to share your awesome ideas!

Tuesday, October 29, 2013

More Techie Tools For Teachers!

Moby Max
I am just getting started with this little goldmine! 
Moby Max assesses each individual student in multiple content areas and then differentiates lessons to meet each student's needs. 


Today, I entered my entire class roster in less than five minutes. 
Tomorrow the fun begins!
My students will access the site through our class Edmodo page (this tutorial gives you info on using the Edmodo planner as well as how to link in Moby Max). 


 This terrific tool is not free. You can purchase a classroom license ($80ish) or a site/school license ($499). There is no limit to the number of classrooms your school can access so the price is really affordable as a school-wide program. 

Sunday, October 20, 2013

Thank You Follower Friends!


           Since I've had such wonderful support since starting Teachers Pay Teachers, I'm going to start a little "thank you" for my followers. Starting tomorrow, each new product I post will be 1/2 price for the first 24 hours. I have always tried to keep my products budget-friendly because, let's face it, teachers spend a good portion of their stunted salaries on classroom materials.

          If you're not following me already, click on "Follow Me" on my TpT store front. When you follow me you will receive automatic emails each time I post a new product. Thanks for taking this journey with me!

Sunday, October 13, 2013

Teacher Tech Tools

There are so many great tech tools for teachers that it's nearly impossible to keep up with them all! Here are a few of my favorites (which also happen to be FREE).

EDMODO
   Edmodo has been around for awhile. I started using it last year and my third graders loved it! This teacher tool is essentially Facebook for the classroom. Once you set up an account, your home screen looks something like this.


     Edmodo allows you to post notes, alerts, assignments, polls, and quizzes for your students.  Parents can also link to their child's account to view his/her activity.  I also use this to post links to videos and learning games that correlate to my classroom concepts. If you're interested in getting started, follow this link to get set up: https://support.edmodo.com/home#forums/20791804-how-to-sign-up-as-a-teacher or watch the tutorial video below. You'll also find directions on how to help your students create accounts for your classroom. You can also find a free app for iPads at the Apple store (however the app has less functions than the website).


Remind 101
    Remind 101 is a fast and easy tool that lets you communicate with students and/or parents via text message, without compromising your personal cell phone number. This is my first year testing out this techie tool, but my husband (a middle school teacher) already uses and loves it. Check out the tutorial to get started:


Class Dojo
   This classroom management is easy to use and fun for the class. Each student gets a monster avatar when you create your class. Your little monsters gain, or lose, points for positive behaviors.  I downloaded this little gem to my iPod so I can reward points anytime during the day.  The parents of your students can also sign up to connect to their child's account. The app can automatically email the parent weekly behavior reports (hello time saver!).


This "How to Add a Class" tutorial is from the Class Dojo Channel. You can subscribe on YouTube.

This tutorial will give your students a brief tutorial on Class Dojo.

*I give my students incentives for earning points.*

101 Tech Tools For Teachers by Simple K12
    I attended a free webinar by Simple K12 last year and received a ton of great info. If you're ready for tech tool overload, check out this tutorial for tons of great resources:


See you soon for more great tips and tools!

Saturday, August 31, 2013

Ready, Set, Go!

      The madness of week one has blasted past like a sonic boom, and now my thoughts are turning toward the long haul.  Whether your class has you counting your blessings or counting the days until the school year ends, just remember it will fly by faster than you think. In the meantime, I'll be posting some new resources and ideas for you to check out. Hopefully, they'll help you along on your journey this school year. 
      This week we spent a lot of time getting to know the rules and routines of our classroom and school, as well as each other.  We explored our classroom with a scavenger hunt; got to know one another with some getting-to-know-you games; and created our own set of classroom rules. Click on my TpT tab to visit my store and download some fun freebies for the beginning of the year. Follow me for new products I'll be adding soon!


Fact or Fib 
(Getting to Know You Game)
*My brilliant co-teacher told me about this super simple game. I'm not sure if it's her invention,
 but I thought I'd give her a shout out- Thanks Bria!*

Materials:
  • Post-it notes or index cards (1 per student)
  • Pencils
Objective: To build a sense of classroom community and help students get to know their peers

Directions:
  1. Ask your students what a fact and fib are.
  2. Tell them that you are going to tell them two facts and one fib about yourself (ex: I have kissed a dolphin; my favorite food is chocolate; and I have a silver cat named Shady). 
  3. Let the students guess which is the fib (My fib is that I have a silver cat named Shady. Sadly, someone catnapped her while I was on vacation five years ago... I still miss my kitty)
  4. Give each student a post-it or index card and let them write down two facts and one fib about themselves (you may want to remind them to mix them up so it's more difficult to identify the fib)
  5. Collect the cards and read them to the class, letting the students guess which is the fib for each student. You could also do this in small groups if you prefer.
*This is also a great correlation to fact vs. fiction if you want to tie it in to a review skill.  I may reuse this game again later when we work on literal vs. nonliteral!

Lessons From Kid President
   A co-teacher (Yes, it was Bria again!) told me about an inspiring video that she had shared with her class, "Kid President: Pep Talk". 


How adorable is this little guy?!

My class was so pumped up by this pep talk that I ran with it! 
The next morning we watched the "Kid President: Pep Talk for Teachers and Students"


After each short video, our class discussed what lessons we'd learned from the video. 
I asked the kids what their most memorable phrase was from each video and it became our inspirational quote of the day.
"YOU WERE BORN TO BE AWESOME!" stayed on our board for the whole week. 

On the third day, we watched the original pep talk video again, and I asked the students to think of one way that they could make the world a more awesome place. 
They were directed to choose a small goal that they could work towards this year, or a big dream goal that they could work toward as they grow up.

My students were so engaged!


After everyone finished, we turned our "We can be AWESOME" goals in to a colorful bulletin board for the front of our room. Everyday we can see how we want to make the world a more awesome place.

1 inspiring young man + free video links + a little creativity=

 BIG CLASSROOM MOTIVATION!


Thanks Kid President!


Saturday, June 1, 2013

Owl-fully Cute Open House

        Last fall I decided to create some cute decor for my Open House.  Since I was hooked on owls because they symbolize wisdom, I filled my giving tree with baby owls.  Each little owl had a classroom wishlist item on the back.  Parents and/or students could pick a colorful owl off the tree to take home. The students brought back the wishlist item on the first day of school.  My parents were so great! I only had a couple of little hooters left by the end of the evening.
     

      I also created a parent sign-in sheet with owl clipart to set under my colorful tree.  The table is really my rolling cart covered with one of my daughters old curtain panels (she's moved on to zebra decor now;)).  I'm trying not to hold on to too many things as I have limited storage, but those plaid panels perfectly matched my decor!


    Right now I'm working on making all my owl-themed paperwork for the beginning of the year... Keep an eye out on my TpT store (http://www.teacherspayteachers.com/Store/Becky-Blair)for new owl-themed products and beginning of the year activities.
     While you're waiting for those, try this little snack on for size.  I created them last fall as Open House treats for my new students to take with them as they left.  The kids loved them and they made an adorable centerpiece for my table. They'd also be perfect to use with a camp-out theme (just stick them in a rustic bucket instead of a colorful tin).

The tag reads: "I can't wait to see you s'more!"
I'll probably make the tags owl-themed this year so they match the rest of my room decor.

Place some craft foam in a colorful bucket and poke the skewers into the foam. Cover the foam with tissue paper.

S'more Pops:

Materials :
1 bag of regular marshmallows
1 bag of chocolate chips (I used milk chocolate)
approx. 1 tsp Crisco
1 box graham crackers 
1 freezer bag
wax paper
1 pkg. wooden skewers 
1 pkg. plastic treat bags (look in the craft section)
1 roll thin ribbon

Directions:
  1. Slide 2-3 mallows on the blunt end of each skewer (they will slide through the pointy end with the weight of the chocolate)
  2. Place the graham crackers in a freezer bag and crush with a rolling pin, or vegetable can. Pour them into a bowl
  3. Melt the chocolate chips and Crisco in a microwave-safe bowl (stir every 30 sec. until the chocolate is  thoroughly melted)
  4. Dip one skewer into the melted chocolate, making sure that the top of the mallow is well-coated.
  5. Immediately roll the mallow skewer in the crushed graham crackers.
  6. Lay the skewer onto wax paper until the chocolate sets (you can put them in the frig or freezer to set them faster).
  7. Repeat with each skewer until you've completed a S'more Pop for each student.  I made several extra in case I had mishaps (or one of my kids snatched one while I wasn't looking).
  8. While you're pops cool, create your gift tags. 
  9. Slide each S'more Pop into a treat bag and tie shut with a piece of ribbon.

Gift Tags:
scissors/paper cutter
glue stick

computer
printer
  1. Open Microsoft Word and create a new document.
  2. Click on the "Mailings" tab
  3. Click on the "labels" icon
  4. Select "single label"
  5. In the "address" box type: "I can't wait to see you S'more!" :D Mr./Mrs. Teacher
  6. Load your plain cardstock in your printer
  7. Click "Print"
  8. Cut the tags apart (or print them on actual labels)
  9. Use adhesive to stick the labels to your cardstock, leaving some colorful cardstock showing around each one.
  10. Cut them apart
  11. Put a single hole punch on the left side of each tag
  12. Tie the tag onto the ribbon on the s'more pop.
ENJOY!